Why: Understanding the need for streaming real-time Oracle CDC events to Kafka
What is so good about Kafka?
- Real-time data streaming: Kafka, as a distributed messaging queue system, provides high throughput and low latency for real-time data processing. Streaming Oracle CDC events to Kafka facilitates real-time capture and processing of data, enabling businesses to rapidly respond to data changes.
- High availability: Kafka ensures high availability through distribution. A Kafka cluster usually consists of multiple brokers, each responsible for storing a segment of the data with replication. Thus, even in the event of a broker failure, other brokers can continue operating, ensuring service availability.
- Scalability: Kafka's distributed architecture, coupled with features such as consumer groups, partitioning strategy, replication mechanism, horizontal scalability, high concurrency processing capabilities, and fault tolerance, enables it to handle massive message data, meeting demands for high throughput and concurrency.
- Efficient querying: Leveraging techniques like sequential write, indexing, binary search, and in-memory caching, Kafka efficiently processes massive message streams while maintaining high performance and low latency for efficient data retrieval.
- High-concurrency writes: Kafka emphasizes high-concurrency data writes and employs various technologies such as zero-copy, batch processing, message compression, and asynchronous processing to enhance data transfer efficiency and processing speed. This capability enables Kafka to handle large volumes of data streams effectively, making it suitable for high-throughput scenarios such as log recording and event sourcing.
- Decoupling data producers and consumers: Kafka's message queue model facilitates decoupling between data producers and consumers, allowing database changes to form a loose coupling with actual data consumers such as applications and analytics systems, thereby enhancing system flexibility.
- Support for event-driven architecture: Synchronizing Oracle data to Kafka enables the construction of event-driven architectures. Database changes can be transmitted as event streams, triggering actions in other components of the system and enabling more flexible and agile business processes.
- Data Integration: As middleware, Kafka can coordinate data flows between different systems, facilitating seamless integration with other data sources and targets. This capability enables systems to better adapt to complex data processing and exchange requirements.
Why real-time data sync matters?
- Real-time reporting and monitoring systems: Businesses rely on real-time monitoring and reporting for operational insights. This includes operational and performance monitoring, where access to database changes in real-time is paramount. By synchronizing data to Kafka in real-time, monitoring systems remain current and effective.
- Event-driven architectures: Modern applications often adopt event-driven architectures, facilitating system integration through a publish-subscribe model. Real-time data synchronization to Kafka is vital for ensuring timely event propagation and processing.
- Enhanced user experience: Applications requiring real-time interaction and responsiveness demand up-to-date data presentation. For instance, in online collaboration or real-time communication apps, users expect immediate visibility into others' actions and changes.
By now, we have gained a basic understanding of the importance of real-time synchronization of data from Oracle to Kafka. Next, let's explore some common synchronization methods.
How: comparison between different data sync solutions
Manual method: leveraging open source tools

Step 1: Preparations
- Install Oracle database: Ensure that Oracle database is installed and properly configured.
- Install Kafka: Install Kafka and start the ZooKeeper service as a dependency for Kafka.
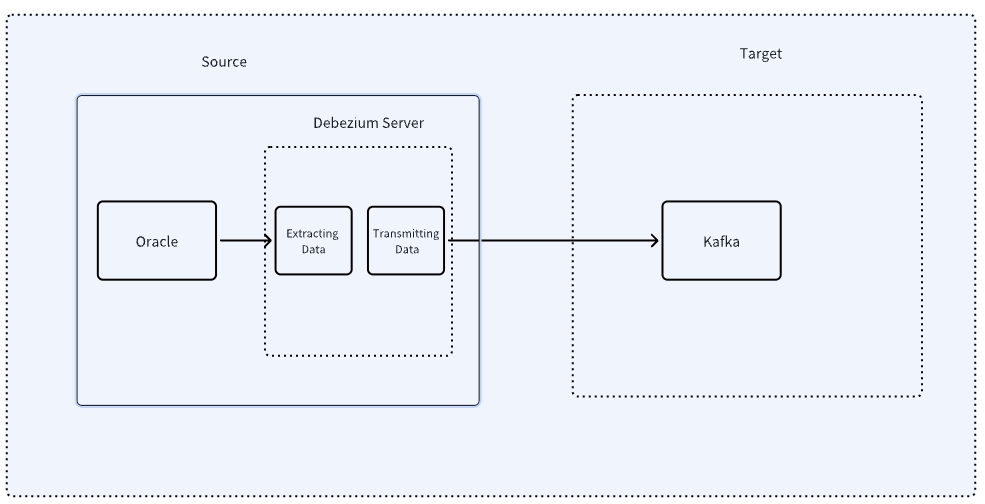
- Install and configure Debezium: Debezium is an open-source change data capture tool used to monitor database changes and send them to Kafka. Download and configure the Debezium Connector for Oracle. (https://debezium.io/)
Step 2: Configure Oracle database
- Enable archive log: In the Oracle database, ensure that the archive log is enabled, which is a prerequisite for Debezium to monitor changes.
ALTER SYSTEM SET LOG_ARCHIVE_DEST_1='LOCATION=/archivelog';
ALTER SYSTEM SET LOG_ARCHIVE_FORMAT='arch_%t_%s_%r.arc';
2. Create CDC user: Establish a dedicated user for Change Data Capture (CDC) and grant the necessary permissions.
CREATE USER cdc_user IDENTIFIED BY cdc_password;
GRANT CONNECT, RESOURCE, CREATE VIEW TO cdc_user;
3. Enable CDC: Activate Oracle's CDC feature and designate a CDC user.
EXEC DBMS_CDC_PUBLISH.CREATE_CHANGE_SET('MY_CHANGE_SET', 'CDC_USER');
EXEC DBMS_CDC_PUBLISH.ALTER_CHANGE_SET('MY_CHANGE_SET', 'ADD');
EXEC DBMS_CDC_PUBLISH.CREATE_CAPTURE('MY_CAPTURE', 'CDC_USER');
EXEC DBMS_CDC_PUBLISH.ALTER_CAPTURE('MY_CAPTURE', 'ADD');
EXEC DBMS_CDC_PUBLISH.CREATE_CHANGE_TABLE('MY_CHANGE_TABLE', 'CDC_USER', 'MY_CAPTURE', 'MY_CHANGE_SET');
Step 3: Configuring the Debezium Connector
- Configure the Debezium Connector: Create a JSON configuration file specifying Oracle connection details, monitored tables, and other relevant information.
{"name": "oracle-connector", // Name assigned to the connector when registering the service.
"config": {"connector.class": "io.debezium.connector.oracle.OracleConnector", // Name of the Oracle connector class.
           "database.server.name": "my-oracle-server", //Logical name providing namespace for identifying the Oracle database server for capturing changes by the connector.
           "database.hostname": "your-oracle-host", //Oracle instance address.
           "database.port": "your-oracle-port", //Oracle database port.
           "database.user": "cdc_user", //Oracle database user.
           "database.password":"cdc_password", //Oracle database password.
           "database.dbname":"your-oracle-database",//Name of the database from which changes are to be captured.
           "database.out.server.name":"oracle-server", // Kafka topic.
           "table.include.list": "CDC_USER.MY_TABLE",//Tables in Oracle to monitor for output data.
           "schema.history.internal.kafka.bootstrap.servers": "192.3.65.195:9092",//Kafka broker list for this connector to write and recover DDL statements to and from the database history topic.
           "schema.history.internal.kafka.topic": "schema-changes.inventory" // Name of the database history topic where the connector writes and recovers DDL statements.
           }
 }
2. Starting the Debezium Connector: Use Kafka Connect to launch the Debezium Connector.
bin/connect-standalone.sh config/worker.properties config/debezium-connector-oracle.propertiesStep 4: Validating synchronization
- Insert data: Insert some data into the Oracle database.
INSERT INTO CDC_USER.MY_TABLE (ID, NAME) VALUES (1, 'John Doe'); - Check Kafka topics: Verify if there are any messages related to table changes in Kafka.
bin/kafka-console-consumer.sh --bootstrap-server localhost:9092 --topic my-oracle-server.CDC_USER.MY_TABLE --from-beginningClassic approach: using Oracle's official tool OGG

Step 1: Preparations
- Install Oracle GoldenGate: Install and configure the Oracle GoldenGate software.
- Install Kafka: Install Kafka and start the ZooKeeper service as a dependency for Kafka.
Step 2: Configuring the Oracle database
-
Enable Archivelog Mode: Ensure that archivelog mode is enabled for the Oracle database.
ALTER SYSTEM SET LOG_ARCHIVE_DEST_1='LOCATION=/archivelog';
ALTER SYSTEM SET LOG_ARCHIVE_FORMAT='arch_%t_%s_%r.arc';
Step 3: Configuring OGG extract and pump
- Create OGG Extract: Configure OGG Extract to capture change data.
cd $OGG_HOME
./ggsci
GGSCI> ADD EXTRACT ext1, TRANLOG, BEGIN NOW
GGSCI> ADD EXTTRAIL /trail/et, EXTRACT ext1
GGSCI> ADD EXTRACT dpump, EXTTRAILSOURCE /trail/et
GGSCI> ADD RMTTRAIL /trail/rt, EXTRACT dpump
2. Configuring OGG Pump: Configure the OGG Pump to transfer captured change data to Kafka.
GGSCI> ADD EXTRACT pump1, EXTTRAILSOURCE /trail/rt, BEGIN NOW
GGSCI> ADD RMTTRAIL /trail/pt, EXTRACT pump1
GGSCI> ADD REPLICAT rep1, EXTTRAIL /trail/pt, SPECIALRUN
Step 4: Configuring OGG Replicat and Kafka
- Edit the OGG Replicat parameter file: Edit the Replicat parameter file to configure connection information and target Kafka topics.
REPLICAT rep1
USERID ogguser, PASSWORD oggpassword
ASSUMETARGETDEFS
MAP source_table, TARGET kafka_topic, COLMAP (...)
2. Start OGG Replicat: Start the Replicat process.
./ggsci
GGSCI> START REPLICAT rep1
Step 5: Validating the synchronization
- Insert data: Insert some data into the Oracle database.
INSERT INTO source_table (ID, NAME) VALUES (1, 'John Doe');-
Check Kafka topic: Verify if there are messages related to table changes in Kafka.
bin/kafka-console-consumer.sh --bootstrap-server localhost:9092 --topic kafka_topic --from-beginningNext-generation real-time data platform tools: cost-effective and user-friendly
Taking Tapdata as an example, which is a modern data platform prioritizing low-latency data movement. It boasts over 100 built-in data connectors, ensuring stable real-time data collection and transmission, sub-second response times for processing, and user-friendly, low-code operations. Common use cases include database replication, data warehousing, and ETL processing.
Tapdata is specifically designed for real-time data synchronization, providing robust and stable data pipeline capabilities. It serves as a viable alternative to traditional synchronization tools like OGG/DSG, enabling seamless data synchronization from databases like Oracle and MySQL to various data targets, whether homogeneous or heterogeneous.

Step 1: Tapdata installation and deployment
-
Register and log in to Tapdata Cloud.
-
Install and deploy Tapdata: Visit the Tapdata official website, follow the instructions, and complete the installation and deployment of Tapdata Agent.
Step 2: Configure data sources and targets
-
Create a new Oracle data source: Go to the Tapdata Cloud connection management page, create a connection for Oracle data source, and verify its connectivity.


-
Creating Kafka Data Target: Repeat the previous steps, locate Kafka in the list of data sources, refer to the connection configuration guide to create a connection to Kafka as the data target, and test it successfully:

Step 3: Configuring Kafka
-
Creating Kafka topic: Create a topic in Kafka to receive data synchronized from Oracle.
bin/kafka-topics.sh --create --topic my_oracle_topic --bootstrap-server localhost:9092 --partitions 1 --replication-factor 1Step 4: Initiating synchronization tasks
-
Creating data sync task: Utilize Tapdata's visual interface to quickly create an Oracle-Kafka data synchronization task by dragging and dropping connections between the data source and target.
-
Starting sync task: Click on the source and target nodes, select the tables to be synchronized, and launch the task. Tapdata will begin capturing data and changes from the Oracle database and sending them to Kafka.
Step 5: Validating synchronization
-
Inserting data: Insert some data into the Oracle database.
INSERT INTO my_table (id, name) VALUES (1, 'John Doe');-
Checking Kafka topic: Use Kafka command-line tools to verify if the synchronized data has arrived at the Kafka topic.
bin/kafka-console-consumer.sh --bootstrap-server localhost:9092 --topic my_oracle_topic --from-beginningHow to choose: comprehensive comparison and selection of solutions
① Manual configuration method
Pros:
-
Customization: Offers full customization to meet specific business needs.
-
Cost-effective: No additional software licensing fees are required.
Cons:
-
Complexity: Requires manual handling of all steps, potentially increasing configuration and management complexity.
-
Maintenance Challenges: For complex synchronization needs, manual configuration may lead to increased maintenance efforts.
-
Time-consuming: Manual configuration demands more time and technical expertise.
② OGG
Pros:
-
Maturity and Reliability: OGG, provided by Oracle, is stable and matured after years of development.
-
Visual Management: Provides a user-friendly management interface, simplifying configuration and monitoring.
Cons:
-
Cost: It's a paid tool with a relatively high price tag, requiring a financial investment.
-
Learning Curve: It comes with a learning curve, particularly for beginners.
③ Tapdata
Pros:
-
Simplified Configuration: Tapdata offers an intuitive configuration interface, reducing complexity in both setup and maintenance.
-
Real-time Monitoring: Features real-time monitoring and alerting, facilitating management and maintenance.
-
Low Latency: Emphasizes low latency and task optimization based on throughput, ideal for high real-time requirements.
-
Cloud-native: Supports cloud deployments, seamlessly integrating with cloud ecosystems.
Cons:
-
Cost Consideration: Both local deployment and Tapdata Cloud incur additional fees after reaching a certain usage threshold.
-
Resource Efficiency: Requires some database resources for log parsing.
Considerations:
-
Tailor to specific needs: Select the solution that aligns with your requirements and team expertise. Manual configuration suits teams with deep technical knowledge, OGG is suitable for stable environments if there's a large enough budget, while Tapdata excels in agility and low latency.
-
Cost-Effectiveness: Balance costs, learning curves, and configuration efficiency when making a decision.
-
Ecosystem Compatibility: Evaluate how well the solution integrates with existing systems and tools.


